

Ever struggled to get screw heads flat? I’ve seen projects ruined when fasteners stick out. This frustration fuels confusion between countersinks and counterbores—let’s fix that.
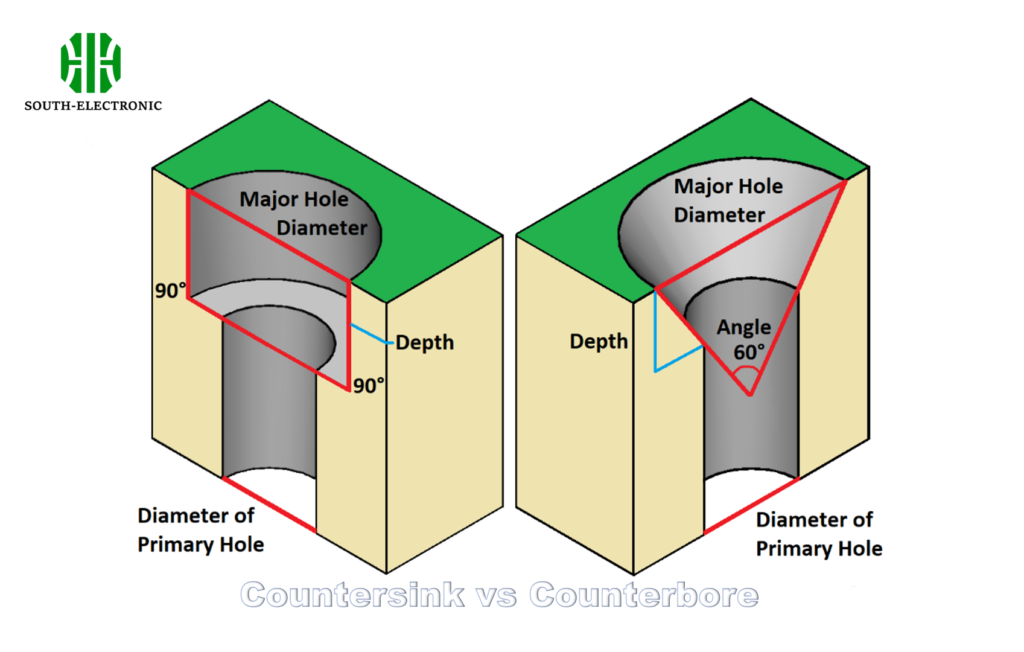
Countersinks create conical holes for angled screw heads, letting them sit flush. Counterbores drill cylindrical holes with flat bottoms for bolts or nuts to hide completely. Remember: taper vs cylinder.
Many DIYers use these holes wrong, wasting time and materials. Choosing correctly affects strength and looks. Let’s explore why these differences matter for your work.
What Do Counterbores and Countersinks Actually Do?
I once snapped a screw head because my hole was wrong. Both solutions hide hardware, but their methods differ critically.
Countersinks allow tapered screws to sit flush in materials like wood or metal. Counterbores form shelf-like holes for bolt heads or nuts. Tapered holes vs flat-bottomed—this changes their function.
Three Key Functions Compared
| Feature | Countersink | Counterbore |
|---|---|---|
| Shape | V-shaped cone | Straight-walled cylinder with flat bottom |
| Fastener Type | Flat-head screws, rivets | Hex bolts, socket caps, nuts |
| Depth Control | Angle determines depth | Fixed diameter needs precise depth measurement |
Angled screws need countersinks. The cone shape matches screw heads exactly. Without that match, screws wobble or stick out. I learned this fixing patio furniture that scratched people.
Counterbores handle bulkier hardware. Their walls are straight and hole bottoms flat. Common uses include mounting brackets where hex bolts sink completely. When I build workbenches, counterbored holes stop snagged clothes.
Material matters too. Countersinks work best in soft stuff like wood or plastic. Hard metals often need counterbores for stability. Always test scrap material first.
When Does My Project Need a Countersink vs a Counterbore Hole?
That cabinet door gap happened because I chose wrong. Picking depends on hardware and surface needs.
Use countersinks for flush surfaces with cone-shaped screws. Choose counterbores when hiding large bolt heads or needing structural support. Metal projects usually demand counterbores.

Decision Factors Simplified
| Scenario | Countersink | Counterbore |
|---|---|---|
| Aesthetic Priority | Best for completely smooth finishes | Leaves small circular indentation |
| Hardware Size | Small-to-medium screws (under 1/4") | Large bolts, nuts, washers |
| Material Strength | Good for softer materials | Needed for hard/thick metal applications |
| Ease of Installation | Faster with basic drill bit | Requires specialized bits like pilots |
For picture frames or tabletops, countersinks give invisible screw heads. The conical hole hides everything neatly. My failed bookshelf showed screw heads because I didn’t countersink deep enough.
Choose counterbores when strength comes first. Engine parts or structural joints need bolt heads fully seated. Remember mounting that fire extinguisher bracket? Counterbores stopped rattling nuts. Always match the bit to your fastener size—test before final drilling.
Thick materials change the rules. Countersinks struggle beyond 1/2-inch depth. Deep holes need counterbores for clean sides. Use stepped drill bits for efficiency.
How Do I Spot Counterbore and Countersink Symbols on Technical Drawings?
I wasted hours misreading prints early in my career. Symbols communicate hole specs instantly.
Countersink symbols show a sharp ‘V’ arrow. Counterbore symbols display a square-bottomed ‘U’ shape. Always check callouts for angles/sizes—they override everything.

Decoding Blueprint Markings
| Symbol Type | Visual | Meaning | Callout Example |
|---|---|---|---|
| Countersink | ◄────── | Tapered hole for screw | "CSK 82° ⌀0.5" |
| Counterbore | ──────── | Cylindrical recess for bolt head | "C’BORE ⌀1.0 x 0.3 DEEP" |
| Combined | ────◄─── | Shows countersink inside counterbore | Rare; specified in notes |
I once misread a "CSK" symbol as counterbore and wrecked aircraft aluminum. The V-shaped arrow means prepare for cone screws. Angles often follow—common ones are 82° or 90°.
Counterbored markings appear as rectangles or deep U-shapes. Look for diameter/depth specs nearby. "C’BORE ⌀8mm x 5mm DEEP" means drill 8mm wide, 5mm down. Symbols appear next to hole cross-sections.
Pro tip: Square symbols mean counterbore slots. Icons with numbers inside denote multiple holes. When confused, find the drawing’s symbol legend first.
Why Isn’t My Countersink/Counterbore Result Flush or Clean?
Crooked holes plagued my first ten projects. Common frustrations trace back to basic mistakes.
Uneven holes stem from misaligned drilling, blunt bits, or wrong speed settings. Chipping occurs when force isn’t steady. Solutions involve proper tools and technique refinement.
Troubleshooting Guide
| Problem | Likely Cause | Fix |
|---|---|---|
| Off-center recess | Drill wandered/slipped | Use pilot hole + guide bushing |
| Rough edges | Dull bit or high RPM | Sharpen/replace bit; reduce drill speed |
| Shallow depth | Incorrect bit size or angle | Match bit to fastener; check angle gauge |
| Surface cracks | Excessive pressure/wrong feed | Apply steady, moderate force |
When my counterbore wasn’t flat, the drill wobbled during entry. Starting with pilot holes fixes this. For clean edges in wood, reverse the drill bit last. I now use brad-point bits for splinter-free starts.
Material alters speed needs. Aluminum requires high RPM; steel needs slow with cooling oil. My garage shelf failed when I rushed steel drilling—heat softened the metal. Countersinks often need reamer finishing for polish.
Always secure materials. That wobbly plastic piece ruined my recess. Clamp everything firmly. For perfect flush fits, test fastener height in scraps first.
Conclusion
Knowing countersink vs. counterbore differences saves time and materials. Match holes to your fasteners, read symbols correctly, and drill carefully. Master these for professional results always.

