
Ever plug in a gadget and it dies instantly? A cold solder joint likely killed it. These invisible flaws lurk inside devices, causing random failures when you least expect it.
Cold joints happen when solder doesn’t melt completely due to low heat or movement during cooling, often worsened by dirty surfaces or cheap materials. They create weak connections that crack under stress.
While knowing why they form helps, spotting and fixing them matters more. Let’s uncover how to identify, repair, and prevent these hidden nightmares.
What Does a Cold Solder Joint Look Like?
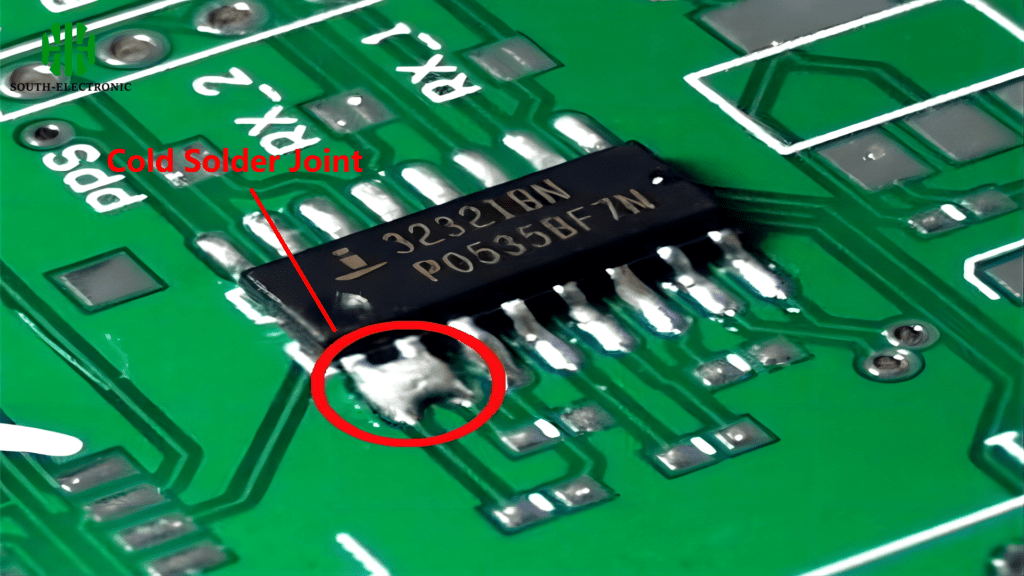
See a foggy joint on your PCB? Don’t ignore it. That matte finish isn’t just ugly—it’s a ticking time bomb for your electronics.
A cold solder joint appears dull, rough, and sometimes cracked—like gray oatmeal, not shiny silver. It may bulge or have voids.
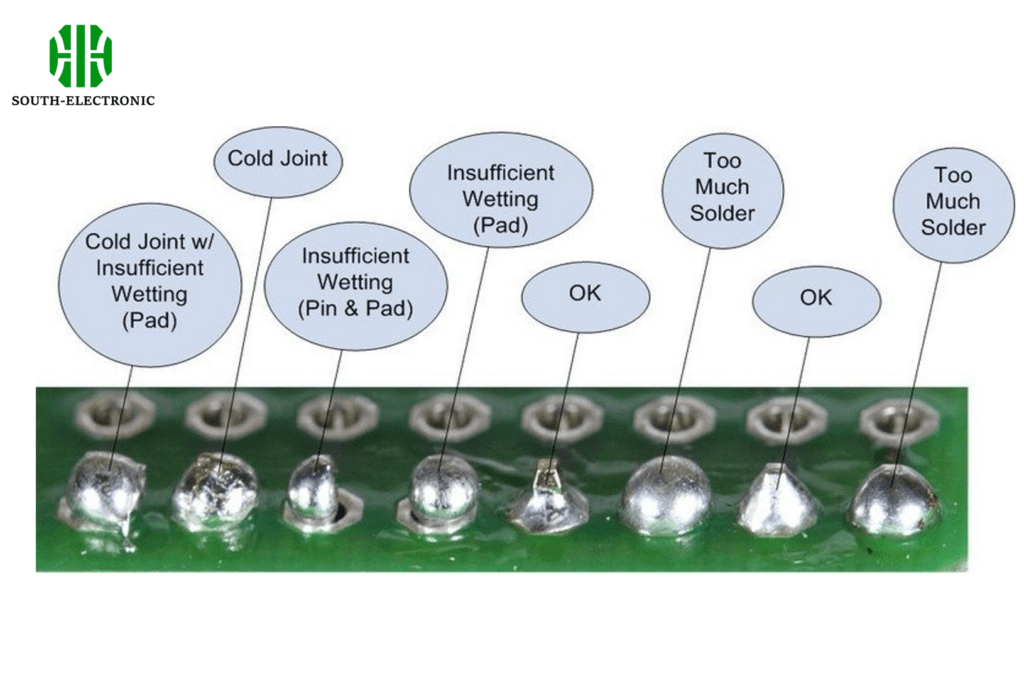
How Appearance Predicts Failure
| Visual Clue | What It Means | Risk Level |
|---|---|---|
| Dull/Grainy Surface | Weak metal fusion | High: Prone to cracks |
| Cracks/Gaps | Contraction during cooling | Critical: Immediate failure |
| Balled Shape | Solder didn’t flow properly | Medium: Intermittent issues |
I once scrapped an entire batch of prototypes because of grainy joints. Unlike smooth, mirror-like good joints, cold joints fail stress tests instantly. Why? Their brittle structure can’t handle vibration or heat cycling. That swollen look? It traps air pockets. Dullness signals poor wetting—the solder never bonded with the component lead. Use 10x magnification; even tiny fissures allow moisture or corrosion to creep in.
How Do You Fix a Cold Solder Joint?
Found a faulty joint? Quick action saves the whole board. Waiting increases corrosion risk and may spread damage.
Fix by reheating with a clean soldering iron: 1) Remove old solder 2) Clean surfaces 3) Apply fresh flux and solder at 330-370°C until shiny.
Step-by-Step Rework Guide
| Tools Matter Most | Tool | Purpose | Error Margin |
|---|---|---|---|
| Desoldering Braid | Absorbs old solder | Protein cleanup is essential | |
| Flux Pen | Removes oxides during reflow | Avoid alcohol-based types | |
| Temperature Gun | Prevents overheating | ±10°C recommended |
Last month, I fixed a synth module by reheating 3 joints. Always pre-tin the iron tip and work fast—overheating lifts copper traces. Apply flux first; it’s like soap for metal, breaking surface tension so solder flows evenly. For large connectors, add solder sparingly. Too much won’t fix poor adhesion. Test wick away excess immediately after seeing the joint shine. Thick joints? Use hot air rework at 300°C with circular motion.
How to Test a Cold Solder Joint?
Suspect hidden cold joints? Random resets or glitches often trace back to them. Don’t wait for total failure—test early.
Visually inspect under bright light first. Then use multimeter continuity checks or infrared cameras to find heat leaks during operation.
Detection and Verification Methods
Troubleshooting Workflow
- Visual Check: Scan for dullness, cracks via magnifier – (5 mins)
- Tug Test: Gently tweak component – if it moves, joint failed
- Continuity Mode: Multimeter beeps inconsistently at resistance >1Ω
- Thermal Imaging: Shows hotspots at cold joints under load
Cold joints hide easily. I once spent hours debugging a drone motor before finding a cracked joint. Conductivity tests won’t catch fractures. Apply light mechanical stress while testing continuity—intermittent signals indicate microcracks. Use temperature to your advantage: cold joints heat faster than good ones during operation. Hydraulic presses reveal strength ratings, but chipmunks or oscilloscopes provide diagnostic details on vibration resistance. Always retest after fixes.
Conclusion
Cold solder joints stem from rushed heating or movement. Spot them by their rough look, fix with proper reflow, and test rigorously. Remember: shiny joints mean reliable circuits.


