
Are you curious about what makes your electronics tick? Many complex devices start with a simple, yet crucial component. Let's uncover the foundation of modern electronics.
A blank printed circuit board (PCB) is the unpopulated base for electronic circuits, providing structural support and electrical connections. It's essentially a blank canvas of insulating material, often fiberglass, with etched conductive pathways.
I remember my first time looking inside an old radio, wondering how all those tiny parts connected. That intricate network, the literal backbone of the device, is exactly what we're talking about today. It's more than just a piece of plastic; it's where electrical dreams begin.
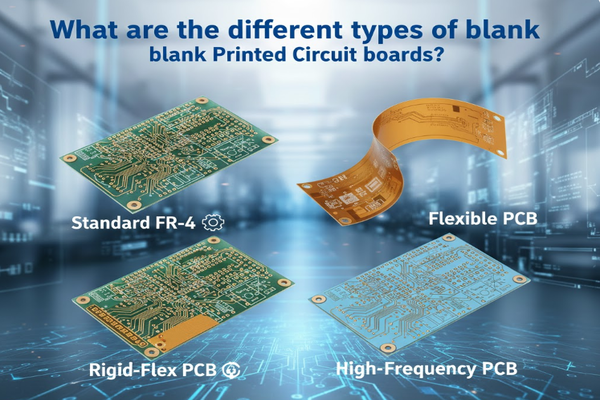
What are the different types of blank printed circuit boards?
Confused by the jargon of different PCB types? Understanding them can seem overwhelming at first. Don't worry, we'll break it down so it makes sense.
Blank PCBs come in many forms, each suited for specific applications, from standard FR-4[^1] to flexible and high-frequency options. Choosing the right type depends on the project's demands for heat, flexibility, or signal integrity.
When I first started tinkering with electronics, I thought all PCBs were the same. It turns out, that's like saying all cars are the same – they get you places, but some are built for speed, others for hauling. Diving into the nuances of blank PCB types reveals a fascinating world of engineering marvels designed for very specific jobs. My own journey into understanding these differences helped me pick the right foundation for my projects, ensuring they performed as expected.
Standard FR-4 PCBs: The Workhorse
FR-4 is the most common and versatile blank PCB material. It's a glass-reinforced epoxy laminate known for its good electrical insulation properties, mechanical strength, and relatively low cost. This makes it ideal for a vast range of consumer electronics and industrial applications.
- Advantages: Cost-effective, widely available, good balance of properties.
- Disadvantages: Not ideal for very high-frequency or high-temperature applications.
Metal Core PCBs: For Heat Management
These PCBs use a metal base material (often aluminum) as their core, which helps dissipate heat much more efficiently than traditional FR-4. They are crucial for high-power LED lighting, automotive, and power conversion applications.
- Advantages: Excellent thermal conductivity, good for high-power devices.
- Disadvantages: Can be more expensive, more complex to manufacture.
Flexible PCBs (FPCs): Bending the Rules
FPCs are made from flexible plastic substrates, allowing them to bend and conform to various shapes. This makes them perfect for compact and lightweight devices, wearables, and situations where space is at a premium.
- Advantages: Space-saving, flexible, can withstand vibration.
- Disadvantages: Higher cost, more delicate handling required.
Rigid-Flex PCBs: The Best of Both Worlds
Combining rigid and flexible sections, rigid-flex PCBs offer the benefits of both. The rigid parts provide sturdy support for components, while flexible sections allow for dynamic bending and interconnections in 3D spaces.
- Advantages: High reliability, space-saving, complex 3D interconnections.
- Disadvantages: Very high manufacturing cost, complex design.
High-Frequency PCBs: For Speed and Signal Integrity
These boards use specialized materials with low dielectric loss, crucial for applications involving high-speed signals like RF, microwave, and high-speed digital circuits. Think of radar systems, satellite communications, and 5G technology.
- Advantages: Excellent signal integrity, low signal loss at high frequencies.
- Disadvantages: Very expensive materials, complex design considerations.
Other Specialized Types
- HDI PCBs[^2]: High-Density Interconnect PCBs feature very fine traces, smaller vias, and higher component density. They enable more compact and feature-rich devices like smartphones and laptops.
- Ceramic PCBs: Made from ceramic materials, these PCBs offer excellent thermal stability and high-frequency performance, suitable for extreme temperature environments and medical implants.
| PCB Type | Key Feature | Best For |
|---|---|---|
| FR-4 | Standard | Consumer electronics, general purpose |
| Metal Core | Heat dissipation | LEDs, power supplies |
| Flexible (FPC) | Bending | Wearables, compact devices |
| Rigid-Flex | Combined rigidity/flex | Aerospace, medical devices |
| High-Frequency | Low signal loss | RF, microwave, 5G |
| HDI | High density | Smartphones, laptops |
| Ceramic | High temp, RF | Medical implants, extreme environments |
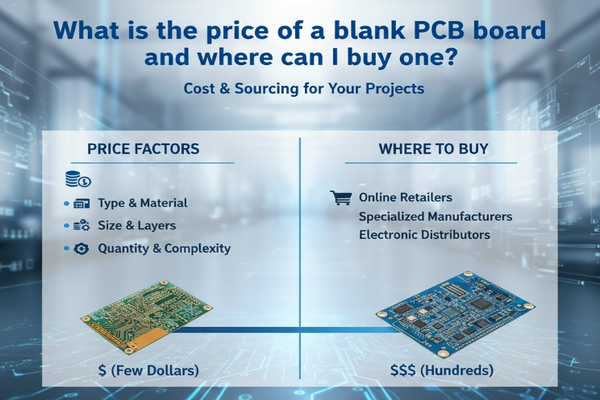
What is the price of a blank PCB board and where can I buy one?
Worried about the cost of blank PCBs for your next project? Price is always a concern when building anything. Let's explore how much you can expect to pay.
The price of a blank PCB board varies widely based on type, size, layers, and quantity, ranging from a few dollars for simple boards to hundreds for complex ones. You can buy them from online retailers, specialized manufacturers, or distributors.
I learned this the hard way on my first large-scale project. I underestimated the impact of board complexity on cost, almost blowing my budget on the raw materials alone. My advice? Always get quotes from multiple sources and understand the factors that drive pricing. This will save you both money and headaches in the long run.
Factors Influencing Blank PCB Price
Several elements come into play when determining the cost of a blank PCB. Understanding these helps me make smarter purchasing decisions.
- Material Type: As discussed earlier, FR-4 is generally the cheapest, while high-frequency or ceramic materials are significantly more expensive.
- Number of Layers: Single-layer boards are the most affordable. As you add more layers (2-layer, 4-layer, 6-layer, etc.), the manufacturing complexity increases, leading to higher costs.
- Size and Shape: Larger boards or those with unusual, custom shapes will cost more due to material usage and tooling requirements.
- Trace Width/Spacing: Finer traces and tighter spacing, especially in HDI boards, require more precise manufacturing processes, increasing the price.
- Hole Size and Type: Smaller drill holes or specialized via types (like microvias) add to the cost.
- Surface Finish: Different surface finish[^3]es (e.g., HASL, ENIG, OSP) offer varying levels of protection and solderability, impacting the final price.
- Quantity: Like most manufactured goods, buying in bulk typically reduces the per-unit cost. Prototypes or small batches are often more expensive per board.
- Lead Time: If you need boards quickly, expedited services usually come with a premium.
Where to Buy Blank PCBs
Finding a reliable source is key. I've used a mix of options depending on my project's scale and urgency.
- Online PCB Manufacturers/Fabricators: These are typically the best option for custom designs and bulk orders. Companies like JLCPCB, PCBWay, OSH Park, and Seeed Studio offer online quoting tools and global shipping. They can manufacture boards to your exact specifications.
- Electronics Distributors: For standard or common blank PCBs, major distributors like Digi-Key, Mouser, and Element14 (Farnell) stock a wide range of basic boards, especially for prototyping or small-scale projects.
- Specialized Component Stores: Local electronics hobby shops or online retailers catering to makers might carry simple blank PCBs, breadboards, and protoboards. These are great for quick, small projects.
- Online Marketplaces: Platforms like eBay or Amazon sometimes have sellers offering blank PCBs, though vetting the quality and specifications can be more challenging.
| Purchasing Option | Best For | Pros | Cons |
|---|---|---|---|
| Online PCB Manufacturers | Custom designs, bulk orders | Cost-effective for volume, high customization | Minimum order quantities, lead times |
| Electronics Distributors | Standard boards, prototyping | Wide selection, quick shipping | Less customization, higher unit cost |
| Specialized Component Stores | Small projects, quick buys | Instant availability, local support | Limited selection, higher prices |
| Online Marketplaces | Niche finds, small quantities | Potentially unique options | Quality can be inconsistent |
My advice: Always get quotes from at least two to three different manufacturers for custom boards. Compare not just price, but also lead time[^4]s, shipping costs, and customer service reviews.
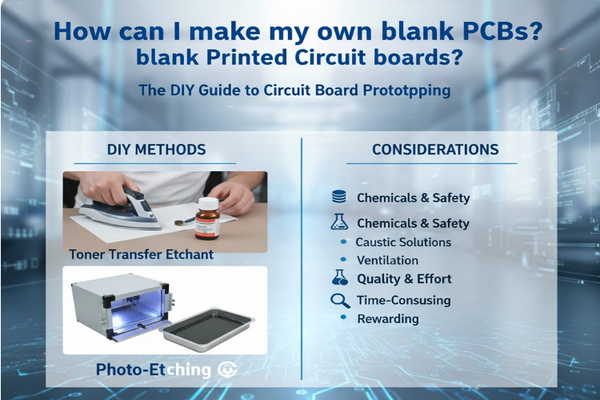
How can I make my own blank PCBs?
Thinking about etching your own circuit boards? The idea of creating electronics from scratch is appealing, but is it worth the effort? Let's explore the DIY path.
Making your own blank PCBs at home is possible, often involving methods like toner transfer or photo-etching. This process requires specific chemicals and safety precautions, and results typically don't match professional quality, but it's a rewarding learning experience.
When I first started out, the allure of making my own PCBs was strong. It felt like a true rite of passage for an electronics enthusiast. My first attempts were, shall we say, "character-building." The fumes, the mess, the occasional botched etching – it was all part of the learning curve. While I now usually order professionally made boards, the experience taught me a lot about the manufacturing process and gave me a deeper appreciation for the precision of commercial boards.
DIY PCB Manufacturing Methods
There are a few popular methods for creating blank PCBs at home. I've tried a couple, and each has its own quirks.
1. Toner Transfer Method
This is perhaps the most accessible method for hobbyists. It involves printing your circuit design onto special paper using a laser printer, then transferring the toner (which acts as a resist) onto a copper-clad board using heat (like from a clothes iron or laminator).
-
Steps:
- Design your circuit in CAD software and print it reversed onto glossy photo paper or specialized toner transfer paper.
- Clean the copper-clad board thoroughly.
- Carefully align the printed design onto the copper.
- Apply heat and pressure (iron or laminator) to transfer the toner.
- Peel off the paper, leaving the toner design on the copper.
- Etch the board using a chemical etchant (e.g., ferric chloride or ammonium persulfate) to remove the exposed copper.
- Clean off the remaining toner to reveal your copper traces.
- Drill holes for components.
-
Pros: Low cost, minimal specialized equipment, relatively quick for simple boards.
-
Cons: Can be inconsistent, difficult to achieve fine traces, messy chemicals.
2. Photo-Etching Method
This method offers better precision than toner transfer but requires more specialized equipment. It involves using a UV-sensitive resist applied to the copper board, exposing it to UV light through a printed transparency of the circuit, and then developing the resist before etching.
-
Steps:
- Design your circuit and print it as a black-and-white negative on a transparent film.
- Apply a photoresist layer to a copper-clad board (or use pre-sensitized boards).
- Place the transparency over the photoresist.
- Expose the board to UV light, which hardens the exposed resist.
- Develop the board to remove the unexposed resist, revealing the copper to be etched.
- Etch the board in a chemical etchant.
- Remove the remaining resist.
- Drill holes.
-
Pros: Higher precision, better for fine traces, more consistent results than toner transfer.
-
Cons: Requires UV light source, developer chemicals, more complex process, higher initial cost.
3. CNC Milling
For those with access to a CNC mill, this method physically carves away unwanted copper, creating the traces. It's cleaner than chemical etching but requires a relatively expensive machine.
- Pros: No chemicals, high precision, quick prototyping.
- Cons: Expensive equipment, generates copper dust, limited to single or double-sided boards.
Safety Precautions
When working with DIY PCB methods, especially chemical etching, safety is paramount. I learned quickly to always use proper protective gear.
- Ventilation: Work in a well-ventilated area to avoid inhaling chemical fumes.
- Protective Gear: Always wear gloves, safety glasses, and a lab coat or old clothes.
- Chemical Handling: Follow instructions for handling and disposing of etchants. They are corrosive and can harm skin and eyes.
- Disposal: Never pour etchants down the drain. Dispose of them according to local regulations.
| Method | Complexity | Precision | Cost (Initial) | Chemical Use | Best For |
|---|---|---|---|---|---|
| Toner Transfer | Low | Medium | Low | Yes | Simple, quick prototypes |
| Photo-Etching | Medium | High | Medium | Yes | More complex, finer traces |
| CNC Milling | High | Very High | High | No | Precise, chemical-free prototyping |
Conclusion
Understanding blank PCBs, from types to sourcing and even DIY methods, is crucial for anyone diving into electronics. This knowledge helps me choose the right foundation for any project, ensuring both efficiency and success.
[^1]: Discover why FR-4 is the most common PCB material and its advantages in electronics. [^2]: Learn how HDI PCBs enable compact and feature-rich electronic devices. [^3]: Learn how different surface finishes impact PCB performance and durability. [^4]: Discover how lead time affects your PCB project timelines.

